|
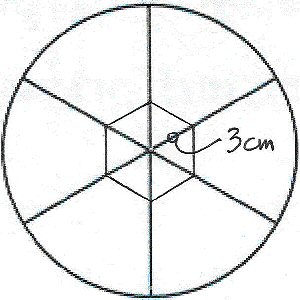
First, wrap a 40cm mari and divide into a simple 6 division, using
invisible thread (the same colour as the wrap thread you are using.).
Still using invisible thread, mark a hexagon approximately 3cm
from the centre of each pole. See figure at left.
|
|
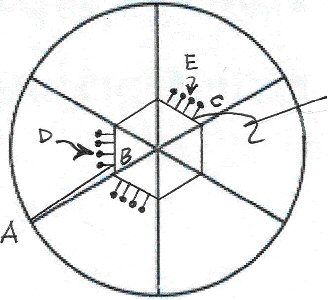
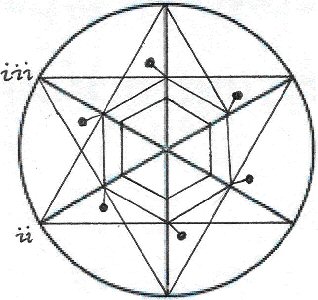
Place marker pins on 4 opposite sides of each of the hexagons, making
sure they are equidistant and starting approximately 6mm in from each
point of the hexagon. See figure at left (there should be another set
of pins opposite Set "D"...)
You are ready to start your design. Begin wrapping your main colour
thread from point A to point B, taking your needle under the hexagon at
the NP and bringing it out at point C. Continue wrapping around to the
SP (again taking your needle under the hexagon) back to point A. Do
this three times so that you have 3 threads laying neatly at the first
marker pin. On the next round bring your thread from point A to the
next marker pin at point D, again taking your needle under the hexagon
and out at point E. Repeat this step on the SP and bring the thread
back to point A. Continue in this way, wrapping three lines of thread
at each marker pin until you have four bands of thread crossing at the
four pins. Use guide pins at the point on the obi where your threads
cross, to hold them in place until you are ready to secure with 3 or 4
threads to finish your ball.
|
|
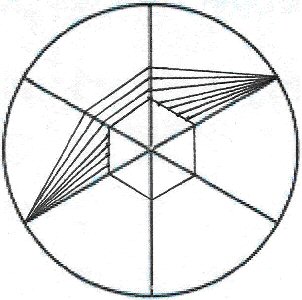
Your next three bands of thread
will lay alongside the hexagon to form the outer edge of the basket
weave. See figure at left.
Repeat this sequence on the adjacent sides of the hexagons, to complete
one direction of wraps.
7 Turn your ball so that the next point on the obi is facing you and
repeat steps 4 to 6, laying the bands of thread on top of the
previously wrapped bands.
|
|
At this point it will be useful to place more marker pins at the points
where your final contrasting thread wraps will cross each other. This
is because when you start your final set of wrapped bands, it is useful
to
know the precise position at which you will start to weave. See figure
at left.
|
Turn your ball again so that the next point on the obi is facing you
and repeat steps 4 to 6. Begin weaving the final layer of bands at the
points where you have placed the marker pins in step 8, making sure you
follow the same 'over/under' sequence all round.
When you have completed this stage, take your first contrasting thread
- I used 2 gold, 1 dark brown, 2 gold - and, beginning from point i),
wrap around your ball, crossing the obi on the opposite side, until you
come back to point i). Turn your ball to point ii) on the obi and
repeat. Turn your ball a third time to point iii) and repeat again
until you have completed the first line of your contrasting thread at
each point on the obi. Take your next contrasting thread and work your
way around the ball as before. Continue in this way until you have
wrapped all 5 strands of your contrasting threads. This will outline
your basket weave pattern.
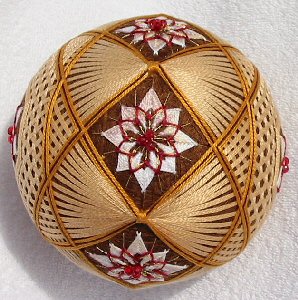
You now have 6 diamond shaped spaces around the obi. Using either
invisible or your choice of marker thread, mark 16 equal divisions and
work a kiku, using alternate marker threads, until you have filled the
space.
Using a contrasting thread (I used one strand of gold and one of deep
red) work 1 or 2 rows of kiku on the remaining alternate marker threads.
At the NP and SP, work a similar kiku, stretching the points to each of
the points of your hexagon, until you fill the space. Again, use a
contrasting thread to work 1 or 2 rows on the remaining alternate
marker threads. I finished my Temari by stitching 3 small red glass
beads at the centre of each kiku.